
PNG is one of the best image formats for screenshots, logos, interface graphics, and images with transparent backgrounds. The downside is file size: an unoptimized PNG can easily be much larger than it needs to be.
If you want to make a PNG file smaller, there are several ways to do it. You can compress the file, reduce its color palette, resize its dimensions, remove unnecessary metadata, or convert it to a more efficient format such as WebP when PNG is no longer required.
For most people, the fastest option is to compress the PNG in the browser first, then resize or convert it only if you still need a smaller file.
In this guide, “without losing quality” means keeping the image visually acceptable for its intended use. Exact results depend on the image and compression settings, so it is always worth previewing the result before downloading it.
Quick Answer: The Fastest Way to Make a PNG Smaller
If you simply want to reduce a PNG file size quickly, start with a browser-based PNG compressor.
With CompressIMG, you can process PNG files directly in your browser without uploading them to a remote server for normal compression.
- Process up to 20 images per batch
- Maximum file size: 20MB per image
- Files are processed locally in your browser
- No signup required
- Batch compression supported
- Transparent PNG backgrounds are preserved when supported by the image
If compression alone does not reduce the file enough, use one of the additional methods below.
Why Are PNG Files So Large?
PNG uses lossless compression, which makes it well suited to graphics that need sharp edges, transparency, or accurate pixel data. Unlike a typical JPG workflow, PNG does not have to discard image information simply to save the file.
That advantage can also result in larger files, especially when the image contains:
- Large pixel dimensions
- Millions of colors when only a small palette is needed
- Transparency information
- Color profile data
- Textual or software-generated metadata
- Complex photographic content that is not well suited to PNG
PNG files may also contain ancillary metadata or color information added by the software that created them. Some of that information may be unnecessary for ordinary web use.
This is why an image exported from a design tool can look perfectly optimized visually while still being much larger than necessary.
5 Ways to Make a PNG File Smaller
1. Compress the PNG Online
For most users, compression is the easiest place to start because it does not require you to redesign the image or change its dimensions.
Open the PNG compressor, add your images, choose an appropriate quality setting, preview the result, and download the optimized files.
The goal is not simply to push the file size as low as possible. Instead, look for the smallest file that still looks good at the size where it will actually be used.
Best for:
- Screenshots
- Website graphics
- Transparent PNG files
- Logos
- Icons
- Images that are already the correct dimensions
Compression results vary greatly. A simple graphic with flat colors can often shrink much more than a complex image containing gradients, shadows, and many colors.
2. Reduce the Color Palette
Some PNG images contain far more colors than they actually need.
A truecolor PNG can represent millions of colors, while an indexed-color PNG can use a palette of up to 256 colors. For a logo, icon, diagram, or simple illustration, a smaller palette can substantially reduce file size while producing little or no noticeable visual difference.
This is sometimes described in image tools as the difference between PNG-8 and PNG-24, although the underlying PNG format is more flexible than those simplified labels suggest.
Color reduction works particularly well for:
- Logos with a few brand colors
- Icons
- Flat illustrations
- Simple diagrams
- Graphics with large areas of solid color
Be more careful with:
- Photographs
- Complex gradients
- Images with subtle shadows
- Artwork where exact color reproduction matters
When reducing colors, always compare the optimized image with the original before publishing.
3. Resize the Image Before Compressing
Image dimensions can have an even bigger effect on file size than compression.
For example, if a logo is displayed on your website at 300 × 100 pixels, there is usually no benefit in delivering a 1500 × 500 pixel version to every visitor.
The browser may visually scale it down, but the visitor still has to download all of those extra pixels.
A better workflow is:
- Determine the approximate dimensions the image needs on your website.
- Resize the original image to a reasonable size.
- Export it as PNG.
- Compress the resized file.
Do not treat fixed numbers such as “every image must be under 100KB” as universal rules. A small icon, a large interface screenshot, and a full-width hero image have very different requirements.
The better rule is:
Use the smallest appropriately sized image that still looks good for its intended use.
4. Remove Unnecessary Metadata
PNG files may contain additional information that is not required to display the image itself.
Depending on how the file was created, this can include:
- Text information
- Software-generated data
- Color profiles
- Creation information
- Other ancillary PNG chunks
Removing unnecessary metadata can reduce the file size without changing what the visitor sees.
The savings may be small compared with resizing or color reduction, but it is still a useful optimization step, particularly when processing many images.
5. Convert PNG to WebP When Appropriate
If you do not specifically need the PNG format, converting the image to WebP may reduce the file size further.
WebP supports both lossy and lossless compression and can also support transparency, so it works well for many types of website graphics.
However, WebP is not automatically better for every image. A very simple PNG may already compress efficiently, and some workflows still benefit from keeping the original PNG.
Consider WebP when:
- The image is primarily used on a modern website
- You want to reduce transferred image data
- You still need transparency
- The converted image is noticeably smaller at acceptable visual quality
Keep PNG when:
- You specifically need the PNG file format
- You need a lossless source file for editing or reuse
- The image is a screenshot or graphic that already compresses efficiently
- The image is used in workflows outside the browser where PNG is preferable
For a broader comparison, see our best image format for web guide.
How to Compress a PNG Step by Step
If compression is the right method for your image, here is the basic process.
1. Open the PNG Compressor
Go to the Compress PNG Online tool.
No application installation is required. The tool runs in a modern browser.
2. Upload Your PNG Files
Drag and drop your PNG files or use the upload control.
You can process up to 20 images at once, with a maximum size of 20MB per image.
3. Choose the Compression Settings
Start with the default quality setting and adjust it only when necessary.
If you need a smaller file, reduce the quality gradually and compare the result rather than immediately choosing the most aggressive setting.
4. Preview the Result
Compare the original and compressed images.
Look closely at:
- Text edges
- Transparency
- Gradients
- Fine details
- Color changes
If the difference is noticeable, use a less aggressive setting.
5. Download the Compressed Images
Once you are satisfied with the result, download the optimized files.
For multiple images, use the available batch download option where appropriate.
Real-World PNG Compression Results
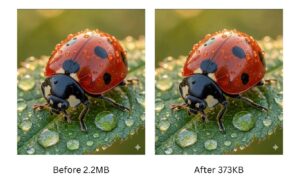
PNG compression results vary depending on the image content, dimensions, number of colors, transparency, and optimization settings.
In our testing, different PNG images produced very different reductions:
| Image Type | Original Size | After Compression | Reduction |
|---|---|---|---|
| Logo (PNG) | 420 KB | 48 KB | 89% |
| Screenshot (PNG) | 1.8 MB | 310 KB | 83% |
| Icon set (PNG) | 280 KB | 35 KB | 88% |
| Illustration (PNG) | 650 KB | 120 KB | 82% |
These numbers are examples from our tests, not guaranteed compression ratios. Your own results can be higher or lower depending on the image.
Which PNG Reduction Method Should You Use?
Need the fastest solution?
→ Compress the PNG online first.
The image dimensions are much larger than needed?
→ Resize first, then compress.
Working with a logo, icon, or simple graphic?
→ Consider reducing the color palette.
The PNG contains unnecessary additional data?
→ Remove unnecessary metadata.
You only need the image for a modern website and want an even smaller file?
→ Compare the PNG with a WebP version.
In many cases, the most effective workflow is:
Resize → compress → preview → convert only if conversion provides a meaningful additional saving.
PNG vs JPG vs WebP: When Should You Switch Formats?
| Format | Best For | Transparency | Compression |
|---|---|---|---|
| PNG | Screenshots, graphics, logos, UI elements | Yes | Lossless |
| JPG | Photographs and compatible downloadable images | No | Lossy |
| WebP | General-purpose web images | Yes | Lossy and lossless |
Use PNG when:
- You need transparency
- The image contains text or sharp interface elements
- You need lossless raster graphics
- The image is a screenshot
Consider JPG when:
- The image is primarily photographic
- Transparency is not required
- The image needs broad compatibility outside the browser
Consider WebP when:
- The image is primarily used on a website
- You want to test whether a modern format produces a smaller file
- You still need transparency
Related tools:
👉 Compress JPG Online
👉 Compress WebP Online
Common PNG Compression Mistakes
Using PNG for Photographs
PNG is excellent for screenshots and graphics, but it is often inefficient for photographs.
If transparency is not required, compare the image with JPG, WebP, or AVIF before deciding which format to publish.
Forgetting to Resize the Image
Compression does not automatically mean the dimensions are appropriate.
A 3000 × 2000 pixel image is still 3000 × 2000 pixels after compression. If it is displayed at only 800 pixels wide, resizing it may provide a larger saving than compression alone.
Assuming Every PNG Can Shrink by the Same Percentage
Compression ratios depend heavily on the image.
A flat-color logo and a complex screenshot can produce completely different results even when using the same settings.
Repeatedly Re-Optimizing an Already Optimized File
Different encoders may occasionally find additional savings, but once a PNG has already been well optimized, further compression usually produces diminishing returns.
When possible, keep the highest-quality source file and create optimized delivery versions from that source.
Ignoring Transparency
If the image needs a transparent background, always preview the result and confirm the alpha channel has been preserved correctly.
Choosing a File Size Target Without Considering the Image
There is no universal rule saying every PNG must be below 100KB or 200KB.
Instead, evaluate file size relative to the image dimensions, visual importance, and how it is used on the page.
Does PNG Compression Help Website Performance and SEO?
Compressing PNG files can improve website performance because visitors need to download fewer bytes.
This can be especially useful when large images contribute to slow loading or when an important image becomes the page’s Largest Contentful Paint element.
However, image compression does not directly guarantee higher Google rankings.
A better way to think about the relationship is:
Smaller and appropriately sized images can improve loading performance and page experience, while search rankings depend on many additional signals.
For website image optimization, focus on the complete workflow:
- Choose the correct image format
- Use appropriate dimensions
- Compress the file
- Use responsive images where appropriate
- Load important images efficiently
- Measure real performance
You can use tools such as Google PageSpeed Insights and your browser’s Network panel to identify oversized image resources.
For a broader website optimization workflow, see our guide to reducing image size for websites.
Frequently Asked Questions
How do I make a PNG file smaller without losing quality?
Start with PNG compression and compare the optimized result with the original. You can also resize oversized images, reduce unnecessary colors, and remove unnecessary metadata. If the image still needs to be smaller, test a WebP version.
Why is my PNG file so large?
Common causes include large image dimensions, many colors, transparency, metadata, color profile information, or photographic content that is not well suited to PNG.
Can I reduce PNG size without changing its dimensions?
Yes. Compression, palette optimization, and metadata removal can reduce the file size without changing the pixel dimensions.
Will PNG compression reduce image quality?
It depends on the optimization method and settings. Pure lossless optimization preserves image data, while palette reduction or other aggressive optimization can introduce small visual changes. Always preview the image before downloading it.
Can I compress PNG files with transparent backgrounds?
Yes. PNG supports transparency, and the CompressIMG PNG workflow is designed to preserve transparent backgrounds where supported. Preview the result before publishing important graphics.
Can I compress multiple PNG files at once?
Yes. You can process up to 20 images in one batch, with a maximum size of 20MB per image.
What is PNG-8 vs PNG-24?
These are commonly used labels for palette-based and truecolor PNG images. A palette-based image can use up to 256 colors and may produce a much smaller file for simple graphics. Truecolor PNG is better for images that need many colors or complex gradients.
Can I compress PNG files on mobile?
Yes. A browser-based compression tool can be used on modern mobile browsers, including iOS and Android, without installing a separate application.
Should I convert PNG to WebP?
Convert only when WebP provides a useful reduction and still meets your requirements. For website graphics, WebP can be a strong option, but PNG may remain preferable for certain screenshots, lossless source files, or workflows outside the browser.
Does compressing PNG images improve SEO?
Not directly. Smaller PNG files can improve loading performance and user experience, but Google rankings depend on many factors. Using WebP, PNG, or any other individual image format does not automatically result in higher rankings.
Final Recommendation
If you want to make a PNG file smaller, start with the simplest method first:
Compress the image and compare the result.
If the file is still too large:
- Check whether the dimensions are larger than necessary.
- Reduce the color palette if the image is simple.
- Remove unnecessary metadata.
- Compare the result with WebP if PNG is not required.
The right method depends on the image, so avoid chasing a fixed compression percentage or file-size target.
The goal is always the same:
Create the smallest file that still looks good and works correctly for its intended purpose.
Need to optimize other formats?
👉 Compress JPG Online 👉 Compress WebP Online