Introduction
Images are essential for modern websites, but large JPG files can slow down your page speed and hurt SEO. If you’re looking for a way to compress JPG without losing quality, you’re in the right place.
In this guide, you’ll learn how to reduce JPG file size quickly, safely, and for free — without installing any software. Whether you’re a blogger, web designer, or small business owner, optimizing your images is one of the simplest things you can do to boost your site’s performance today.
Why You Should Compress JPG Images
Compressing JPG images is important for several reasons:
- Faster website loading speed
- Better Google rankings (Core Web Vitals)
- Improved user experience
- Reduced bandwidth usage
Large images can significantly slow down your site, especially on mobile devices. That’s why image optimization is a must.
But there’s more to it than just speed. Google’s Core Web Vitals — the metrics Google uses to evaluate page experience — are directly affected by how quickly your images load. Specifically, Largest Contentful Paint (LCP) measures how fast your main image appears on screen. Oversized JPG files are one of the most common reasons sites fail this metric.
According to HTTP Archive data, images account for over 50% of the average webpage’s total weight. By compressing your JPGs, you can often cut your page size in half — without any visible difference to your visitors.
What Is JPG Compression and How Does It Work?
JPG (also written as JPEG) uses lossy compression, which means it reduces file size by permanently discarding some image data. The key is finding the right balance: compress too little and you waste bandwidth; compress too much and the image looks pixelated or blurry.
Modern compression algorithms are smart enough to discard data that the human eye is least likely to notice — typically in areas of complex texture or subtle color gradients. This is why a well-compressed JPG at 75–80% quality often looks identical to the original, yet can be 60–70% smaller in file size.
Why JPG and Not PNG or WebP?
JPG is the most widely used format for photographs and realistic images. Here’s when to use each format:
- JPG → Best for photos, product images, and anything with lots of color variation
- PNG → Best for logos, screenshots, and images that need transparency
- WebP → Best overall compression, but not supported in all older browsers
If your images are photos or hero images on your website, JPG is usually your best starting point. Once compressed, you can even convert them to WebP for additional savings.
Best Way to Compress JPG Online (No Quality Loss)
The easiest way to compress JPG images is by using a browser-based tool — no software installation, no file uploads to third-party servers.
👉 Try our free tool here: Compress JPG Online
Key benefits:
- No file uploads (processed locally in your browser)
- Completely free, no limits
- Fast compression in seconds
- No quality loss (adjustable settings)
- No signup required
Because everything happens locally in your browser, your images never leave your device. This makes it a safe option even for sensitive or private photos.
Step-by-Step: How to Compress JPG Images
Follow these simple steps:
1. Upload Your JPG Images
Click the upload button or drag and drop your images directly onto the page. You can compress multiple files at once with batch upload.
2. Adjust Compression Quality
Set the quality between 60%–80% for the best balance between file size and visual quality. For most website images, 75% is the sweet spot.
3. Start Compression
Click “Start Compression” and wait a few seconds. The tool processes your images instantly in the browser.
4. Preview the Result
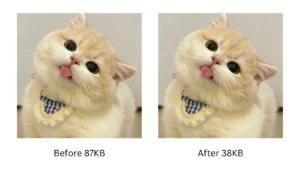
Before downloading, compare the original and compressed versions side by side. Check that the image still looks sharp and clear.
5. Download Your Images
Download each image individually, or download all compressed files at once as a ZIP archive.
What Is the Best JPG Compression Quality?
The ideal compression level depends on your specific use case:
| Quality Setting | File Size | Best For |
|---|---|---|
| 60%–70% | Smallest | Thumbnails, email attachments |
| 70%–80% | Balanced | Website images (recommended) |
| 85%–90% | Larger | Print, high-detail product photos |
For most websites, 75% is the sweet spot. You get a significantly smaller file size while keeping the image looking clean and professional.
If you’re compressing images for social media, 70% is usually fine — platforms like Instagram and Facebook recompress your images anyway when you upload them.
Common Mistakes to Avoid When Compressing JPGs
Even experienced users make these errors. Here’s what to watch out for:
1. Compressing an already-compressed JPG Every time you save a JPG, it loses quality. If you compress a JPG that was already compressed, the quality degradation compounds. Always start from the original source file when possible.
2. Forgetting to resize before compressing Compression reduces file size, but it doesn’t change image dimensions. A 4000×3000px image compressed to 70% is still a 4000×3000px image — which is far larger than any website needs. Resize your image to the actual display dimensions first, then compress.
3. Using the wrong format If your image has a transparent background, don’t save it as JPG — JPG doesn’t support transparency and will fill the background with white. Use PNG instead.
4. Compressing once and forgetting If you update product photos or blog images regularly, build compression into your workflow from the start. Compress every image before it goes on your site, not after.
Tips to Reduce JPG File Size Even More
Here are some extra tips to squeeze out additional savings:
- Resize images before compressing — match the image dimensions to the actual display size on your page
- Strip EXIF metadata — cameras embed GPS location, camera model, and other data into JPGs; removing this can save 10–30KB per image
- Avoid uploading images larger than needed — a blog post doesn’t need a 5MB hero image
- Use WebP format for better compression — WebP can be 25–35% smaller than JPG at equivalent quality
- Compress images before uploading to WordPress — don’t rely solely on WordPress plugins to do it after the fact
👉 You can also try converting to WebP: Compress WebP Images
JPG vs PNG vs WebP: Quick Comparison
| Format | Best For | Transparency | Typical Size |
|---|---|---|---|
| JPG | Photos, realistic images | ❌ No | Small–Medium |
| PNG | Logos, graphics, screenshots | ✅ Yes | Medium–Large |
| WebP | All-purpose web images | ✅ Yes | Smallest |
If you want the smallest file size with the best quality, WebP is usually the best choice for modern websites. However, JPG remains the most universally compatible format and is perfectly fine for most use cases.
How Much File Size Can You Actually Save?
Here’s a real-world example of what compression can achieve:
- Original JPG (hero image, 1920×1080px): 2.4 MB
- After compression at 75%: 380 KB
- Size reduction: 84%
That’s a massive difference — and to the average visitor, the two images look identical. Multiply this across 10, 20, or 50 images on your site, and the impact on page speed is enormous.
Frequently Asked Questions
Is JPG compression safe? Yes. When using a browser-based tool like ours, your images are processed entirely on your device. They never leave your browser or get uploaded to any server.
Will I lose image quality? Not noticeably. With the right settings (70–80% quality), the compression is virtually invisible to the human eye. You can always preview the result before downloading.
Can I compress multiple JPG images at once? Yes. Our tool supports batch compression, so you can upload and compress many images at the same time and download them all at once.
What’s the maximum file size I can compress? There’s no file size limit. Since compression happens locally in your browser, you’re only limited by your device’s memory.
Does compressing JPG images affect SEO? Yes — positively. Smaller image files lead to faster page load speeds, which improves your Core Web Vitals scores and can directly boost your Google rankings.
Can I compress JPG on mobile? Yes. Our tool works on any device with a modern browser, including smartphones and tablets.
Final Thoughts
Compressing JPG images is one of the easiest ways to improve your website’s performance and SEO. It takes just a few seconds, costs nothing, and the results are immediately measurable in your page speed scores.
The key is to make it a habit: compress every image before it goes live on your site. Over time, this single practice can dramatically reduce your page weight and improve the experience for every visitor.
If you want a fast, secure, and free solution, try our tool below: